Remote workforce is a new dimension during the COVID-19 crisis expected to continue, meaning business’s will need to adapt. Acumatica Cloud ERP allows customers to access the ERP application from anywhere and any time, they also provide the option to access via any devices – laptops, desktop, iPad, tablet and phones.
Acumatica Mobile app is geared towards native app for Android and iOS, you can download these apps for free from play store and connect to your ERP instance and it’s free included in your pricing, access your data on the go.
Click here to read Mobile app benefits for Companies using Andorid or iOS Acumatica app
How to expose Acumatica Screens to Mobile app?
With the introduction of the Mobile app and limited screens exposed in earlier versions and with latest enhancements made in 2018, 2019 and 2020 releases, Acumatica is allowing to expose built-in screens, custom screens, Generic Inquires, Dashboards to show up in mobile app for Android or iOS.
Acumatica makes it easier for developers or users to expose Acumatica screens or custom screens or data to mobile devices through the mobile android and iOS apps.
We can accomplish customizing mobile apps through 2 techniques
- No-coding/low-coding and
- Customization package
In this article we will review both techniques and understand how customers can expose data or a developer can expose screens.
1st Technique – Low Coding/No-Coding:
 In this scenario you can enable any Generic Inquiry to show up on the Mobile app without any piece of coding, just click the checkbox [ ] Expose to Mobile and your done.
Pros: It’s quicker and easier and it takes all the fields exposed on the GI results and shows the output, you can control the fields by altering the results in your GI, that’s about it, quick and dirty.
Cons: You won’t be able to configure the resulting appearance of the generic inquiry screen, such as fields to be displayed, tabs, filters, title, and icon on the main menu.
This approach will work great if your not sharing this GI with other instances and will stay in only your instance of Acumatica ERP. Not a good fit for ISV solutions or plugins or packages, but great for self-use, quickly expose data to mobile app without any coding.
What if we needed to expose an Acumatica screen or a custom screen? Read on to technique B.
2nd Technique – Customization Package:
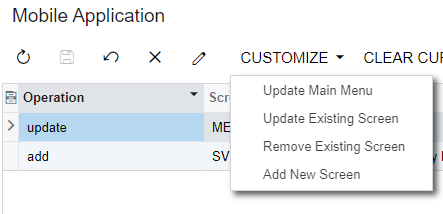
 In this scenario you will create a new customization package, in the Customization Project Editor, click Mobile Application from the navigation menu, you can add existing screen or new screen and have to do bit of coding to expose the fields you want to show, the interactions you want the user to perform, saving, attaching and performing few activities.
(Screenshot from 2019 R2)
Pros: The customization of the Acumatica mobile app is performed on the Mobile Application page of the
Customization Project Editor. All changes made on that page are saved as a part of the customization
project, you can share this package with any Acumatica instance and deploy your changes, perfect way to distribute for ISV providers, plugins or custom packages. Our COVID Care package used this approach.
Cons: It does need you to understand programming and coding is required, not for end-users so stay away unless you want to lose some hair.
How to add Custom Screen to Mobile App?

Here we will cover how to customize and an existing screen or new screen, publish the package and expose the screens to mobile app, code reference from 2019 R2 and above.
Step 1: Create a new customization project or use an existing project
Step 2: Add a new screen or existing screen, since we are adding a new mobile screen we will add a new screen
 add screen SV301010 {
  add container "SurveyResponse"
    {
       add field "DisplayName"
       add field "QuizCD"
       add field "QuizedUser"
       add recordAction "Save" {
       behavior = Save
 }
 add recordAction "Cancel" {
 behavior = Cancel
 }
Step 3: Save and Publish the package you just added the above piece of code referencing the screen ID, container and fields to show
Step 4: You can extend the functionality of displaying other fields and use controls, configure the interaction of accepting data, collecting pictures, geo location and much more
Below piece of code displays attributes grid on mobile with attribute value and options.
  add container "Attributes" {
    attributes = True
    attachments {    }
    }
   -- Shows attributes grid on mobile
Enabling a Submit button on the mobile screen for accepting user interaction
add recordAction "Submit" {
 syncLongOperation = true
 behavior = Record
 }
Using Acumatica Mobile platform we used second technique to build Acumatica Surveys, a mobile app/screen to allow employees to respond to surveys, click to read Acumatica Survey/COVID-19 project
Technical Tip:
 Once you identify the screen your going to expose to mobile, from the screen on your web instance open the web service page from TOOLS –>Web Service and click on Service description to view WSDL, you have to use the value defined in your code for example in our screen we defined “SurveyResponse” as container name and you have to review your names and reference in the mobile XML definition for it to show up, it’s quite impt step.
 Based on your screen functionality you would build and develop your pages for mobile usage, test this on Android and iPhone devices, personally use Samsung Flow for testing my Android phone.
It’s quite important to refer to your training course material T400 and T410 and get your hands on, you may get close to 80% to get it working and rest is un-documented features as to how it renders the user controls into native app, so there is going to be 20% of dependency on Acumatica Dev support, just a matter of time as more developers or users start exploring the mobile app.


